Resize a Photo on iPhone
- Importance of resizing photos on an iPhone.
- Methods and tools available for resizing photos
- Tips on maintaining photo quality during resizing
Importance of resizing photos on an iPhone
To resize a photo on iPhone is a crucial practice with numerous benefits. Firstly, it conserves valuable storage space by reducing the size of high-resolution images, preventing your device from becoming cluttered with photos. This, in turn, ensures that your iPhone continues to function smoothly without the need for frequent storage management or costly upgrades. Secondly, resizing photos facilitates faster sharing, as smaller image files upload more quickly and enhance the user experience.
It also reduces data usage, making it ideal for those on limited data plans especially when you want to resize photos on Windows 10. Resized photos are optimized for various platforms, ensuring they look their best on social media, websites, and different devices. They are also more efficient when sent via email, easier to edit, and can be printed with higher quality. Resizing photos can even extend your iPhone’s battery life and contribute to privacy and security by allowing you to share lower-resolution versions of images while safeguarding the original high-quality files. In essence, resizing photos on an iPhone is a practice that improves storage efficiency, sharing speed, image quality, and user experience, making it an essential part of optimizing your smartphone usage in today’s digital world.
Methods and tools available for resizing photos
PicWish
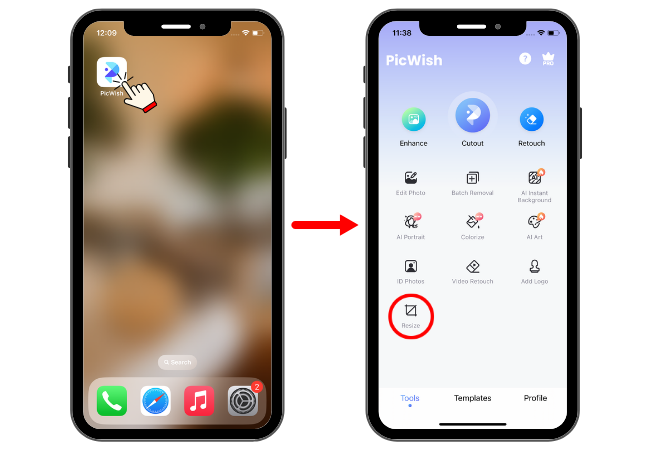
PicWish is a noteworthy AI-powered photo editor available on the App Store on how to resize a photo on iPhone. Its intuitive user interface makes it accessible to users of varying skill levels, ensuring a smooth experience when adjusting the dimensions of your images. The resizing feature in PicWish offers precision as it allows users to specify dimensions in pixels or percentages. This level of control is especially beneficial for those who require exact image sizes for specific purposes, such as social media and printing. To maintain the original aspect ratio of photos and prevent distortion, this amazing tool provides an aspect ratio lock, a vital feature for maintaining image integrity during resizing. Here are the steps that you need to follow to use PicWish.
- Launch the app on your iPhone and choose Resize.

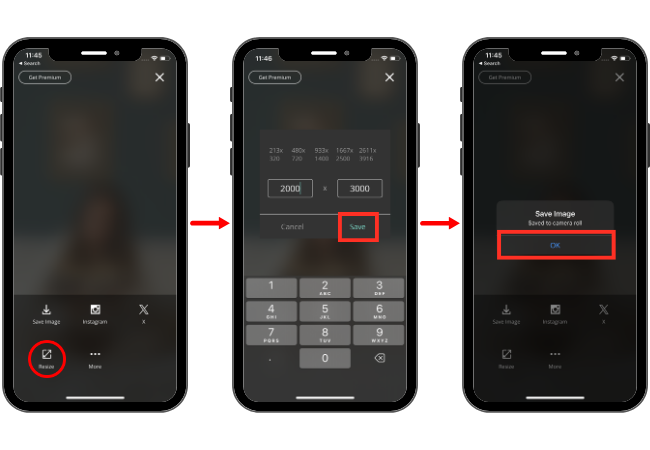
- Upload your photo and customize your size.
- You can also adjust manually or just choose from the given presets.

- Save your image once done.

Image Size
Another tool is Image Size. This is available on the App Store and is a highly practical tool for iPhone users who are looking for a tool to resize photos with ease. What distinguishes this app from the rest is its user-friendly interface, making it accessible to users, from beginners to more experienced photographers. With this amazing tool, resizing photos is a straightforward task, and it doesn’t require a steep learning process. One of its well-known features is the ability to customize resizing where users input precise dimensions in pixels, inches, or percentages, making it ideal for users with specific size requirements for their photos, whether for web, social media, or printing. Additionally, it preserves the original aspect ratio, making sure that the images don’t become distorted during resizing. Check the steps below to use this app.
- Open the app and upload your photo.
- Choose your desired size from pixel, mm, cm, or by inch.
- Save the image once done.

Pixlr
You can also check Pixlr. This tool is also available as an iOS app and is popularly known for its versatile photo editing features. It also serves as a robust tool for resizing photos on an iPhone. Moreover, it also offers an amazing set of editing options, such as resizing, which makes it a valuable asset for anyone looking to modify image dimensions while maintaining overall quality. Furthermore, this tool’s interface is user-friendly, and caters a wide range of users, from beginners to experienced photographers. You may use the steps listed below as your guide.
- Run the app and choose photos.
- Upload your photo and tap Done.

- Go to Resize then input your preferred size then tap Save.

Picsart
PicsArt stands out as a versatile and feature-packed photo editing app to help you resize pictures on iPhone. It offers a range of tools for resizing photos on an iPhone while also providing creative options for users to explore. Apart, from its features and enhancements PicsArt includes a resizing feature that comes in handy for those who want to adjust image dimensions without compromising quality. Moreover, it has a user interface designed to cater to photographers of all levels whether they’re beginners or experienced. One notable feature is the ability to manually input custom dimensions in pixels allowing for resizing control and the app includes an aspect ratio lock feature that ensures the original aspect ratio of photos remains intact preventing any distortion and preserving the image’s integrity. Below are the steps provided for you to use this app.
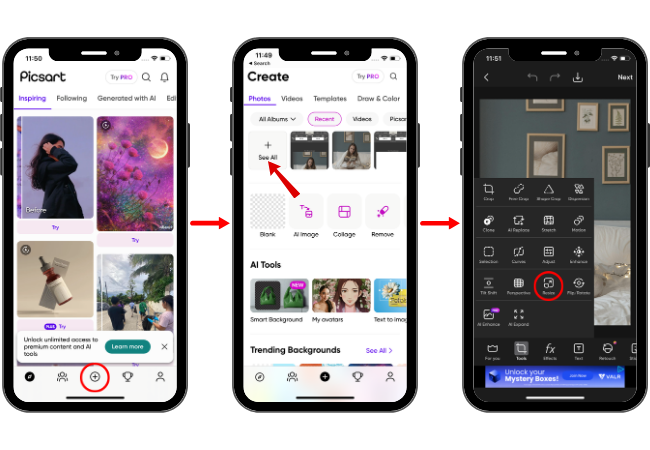
- Open the app and tap the (+) sign to upload your image.
- Choose Tools then hit Resize.

- Input the size of your choice then tap Save.

InstaSize AI Photo Editor
Then we have the InstaSize AI Photo Editor, which you can find on the App Store is a tool that focuses on resizing photos and optimizing them for social media platforms. It’s perfect, for those who want to make sure their photos are tailored specifically for sharing on platforms like Instagram, where accurate dimensions are important. One of the things about InstaSize is that it provides a to use interface so users can resize their images efficiently without compromising quality. A standout feature of InstaSize is its ability to resize photos while maintaining the aspect ratio. This ensures that images don’t end up looking stretched or distorted which is crucial for preserving the integrity of your content. Additionally, users have the option to crop their photos to dimensions allowing them to adapt their images, for platforms or settings.
- Launch the app, tap the (+) sign, and choose Image Resizer.
- Upload your image and choose from the given presets such as Facebook, Instagram, YouTube, and many more.

- Tap the Save button once done.

INSTFIT
The last tool is INSTFIT. This is a dedicated tool for preparing photos for Instagram, ensuring that they fit the platform’s square format without the need for cropping. As one of the tools to resize a photo on an iPhone, InsFit excels at simplifying the process of adapting images to Instagram’s specific requirements. Its focus on this niche makes it an ideal choice for users who prioritize maintaining the integrity of their photos on this popular social media platform.
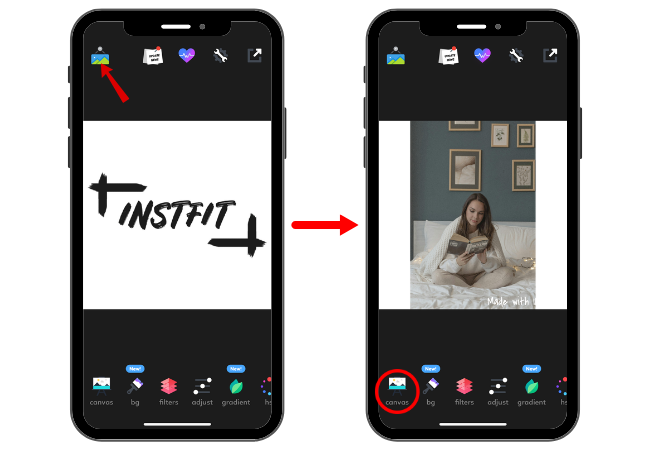
- Run the app and tap the gallery icon to upload your photo.
- Go to Canvas below and choose your desired size from the given presets.

- Once done, get it by saving your photo.

Tips on maintaining photo quality during resizing
Maintaining photo quality during resizing is crucial to ensure that your images continue to look sharp and visually appealing. Here are some tips to help you preserve image quality while resizing photos on an iPhone:
- Use a High-Quality Resizing Tool
Choose a reliable resizing tool or app that is known for maintaining image quality during the resizing process. The built-in Photos app on the iPhone is a good option as it usually does a good job of preserving quality.
- Aspect Ratio Consideration
When resizing, maintain the original aspect ratio of the image. This means that if you change the width, the height should change proportionally, and vice versa. Distorting the aspect ratio can lead to stretched or squished images.
- Choose the Right Resolution
Pay attention to the resolution settings when resizing. Select a resolution that is appropriate for the intended use of the image. For example, lower resolutions are suitable for web sharing, while higher resolutions are better for printing.
- JPEG Compression
If you’re saving your resized image as a JPEG file, be cautious with the compression level. Lower compression (higher quality) results in larger file sizes but better image quality. Higher compression (lower quality) reduces file size but can introduce artifacts and reduce image quality.
- Avoid Repeated Resizing
Try to resize images only once or as few times as possible. Repeated resizing can lead to a cumulative loss of quality. If you need multiple versions of an image at different sizes, it’s best to resize from the original, high-resolution file each time.
- Zoom In for Fine Adjustments
When fine-tuning the resizing process, consider zooming in on the image to closely inspect the details. This can help you ensure that the resized image maintains its sharpness and clarity.
- Regularly Backup Originals
Before resizing any image, it’s a good practice to back up the original, high-resolution version. This way, you can always revert to the original if the resized image doesn’t meet your expectations.
- Test with Sample Images
If you are resizing images for an important project, consider testing the resizing process with sample images first to gauge the results and make adjustments as necessary.
- Use Dedicated Editing Apps
Dedicated photo editing apps, such as Adobe Lightroom or Snapseed, offer more advanced resizing and quality preservation options. These apps often provide greater control over the resizing process.
Conclusion
There are several powerful and user-friendly tools available on the App Store for resizing photos on iPhones, each catering to different user needs and preferences. These apps, including PicWish, Image Size, Pixlr, PicsArt, and InsFit, offer a range of features for precise resizing, aspect ratio preservation, batch resizing, compression options, and creative enhancements. Whether you’re a professional photographer, a casual image editor, or someone focused on optimizing images for specific platforms, there’s an app that suits your needs.


Leave a Comment