Top 5 Tools to Help you Remove Logos from Pictures
PicWish
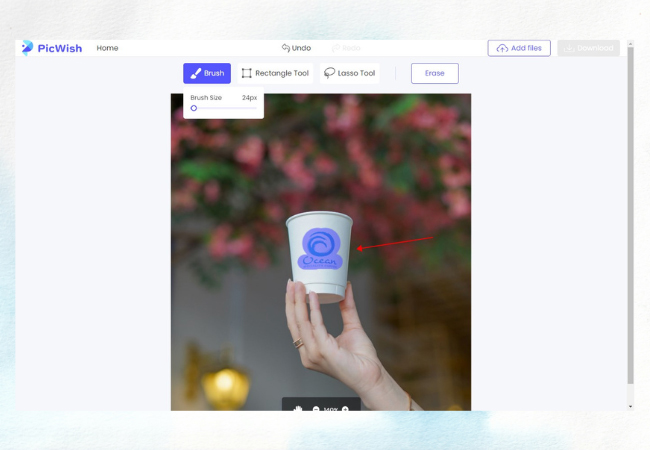
PicWish is an online platform that provides a tool or service to remove logo from photos, which can be helpful in enhancing the overall look of a photo by removing any distracting elements. Generally, most online tools or software that perform this function follow a similar process, which involves uploading the photo, selecting the unwanted object, erasing it, and using any other editing tools available to refine the photo.
- Upload your photo to the online tool or software.

- Select the object you want to remove from the photo using a selection tool or brush. Click on the “Erase” button to remove the selected object.

- Use any additional editing tools available to refine the edited photo, such as adjusting brightness, contrast, or color.
Adobe Photoshop
Next is Adobe Photoshop. This is a well-known software created by Adobe Inc. that is widely used by artists, graphic designers, and photographers to edit and manipulate digital images, as well as to create graphics, logos, and other visual elements. It comes equipped with a broad array of tools and features for image editing, which enable users to modify the color and tone of images, remove unwanted elements, retouch photos, and create intricate compositions by merging several images together.
- Open your image in Photoshop.
![use photoshop]()
- Select the “Lasso” tool from the toolbar on the left-hand side of the screen. Use it to draw a rough outline around the object you want to remove.
![choose lasso tool]()
- Go to the “Edit” menu at the top of the screen and select “Fill.”
![click fill]()
- In the “Fill” dialog box, choose “Content-Aware” and click “OK.”
![select content aware]()
- Photoshop will automatically fill in the area where the object was with surrounding pixels, creating a seamless result.
![save image]()
GIMP
GIMP is an image editing software that is free and open-source, and it can be downloaded on Windows, Mac, and Linux operating systems. It is a versatile program that enables users to perform various image editing tasks such as photo retouching, image composition, and image authoring. One of the frequent image editing tasks is removing an object from an image, and GIMP makes it effortless to achieve. Below are the steps to follow when removing an object from an image using GIMP:
- Open the image in GIMP by clicking on “File” and select the “Rectangle Select Tool” from the toolbox on the left-hand side of the screen.
![choose rectangle tool]()
- Use the tool to select the area around the object that you want to remove. Click on “Edit” in the top menu and select “Cut” to remove the selected area.
![select cut]()
- Use the “Clone Tool” from the toolbox to fill in the blank space with surrounding pixels. Select the “Clone Tool” from the toolbox and adjust the brush size to match the size of the area that needs to be filled in.
![fill color]()
Inpaint
Then we have Inpaint. This is a software program that is intended for eliminating undesired elements from digital images. It functions by analyzing the pixels adjacent to the selected area and filling it with appropriate background colors, rendering the object invisible. In addition, Inpaint is beneficial for individuals who work with digital images, such as photographers, graphic designers, and amateurs alike. The tool can be utilized to remove logo watermark, flaws, and other unwanted objects from product images, or improve portrait images.
- Go to its official site Click the “Upload Image” button to select the photo you want to edit.
![upload image]()
- Once the image is uploaded, select the area you want to remove using the red marker tool. You can adjust the size of the marker tool using the slider on the left. After that, click the “Erase” button to start the process. Inpaint will automatically fill in the area with surrounding pixels to make it look seamless.
![chose erase]()
- Once the removal is complete, you can preview the edited image by clicking the “Compare” button to see the before and after versions.
![save image]()
Paint.NET
Paint.NET is an image editing software that is both powerful and easy to use, making it a great option for people of all skill levels. With a variety of tools and the ability to use plugins, it is capable of handling a wide range of image editing tasks, and its active community makes it a versatile and helpful tool. However, it is important to note that removing objects from images can be a time-consuming process, especially if the object is intricate or the background is intricate. In certain situations, it may be necessary to use additional editing tools or methods to achieve the desired outcome.
- Open the image you want to edit in Paint.NET. Select the object you want to remove using the Lasso Select tool or Magic Wand tool.
![pick lasso tool]()
- Once the object is selected, press the Delete key on your keyboard. This will remove the object from the image.
![remove logo]()
- Then use the color picker and Paint bucket to cover the transparent part.
![fill color]()
- Once you are satisfied with the edited image, save it using the File > Save As option.
Conclusion
There are several ways to eliminate a logo from an image, such as utilizing specific software like Adobe Photoshop or web-based tools like Remove.bg. However, it’s crucial to bear in mind that removing a logo without authorization can breach copyright laws and result in legal ramifications. Hence, it’s advisable to request permission from the copyright holder before making any changes to the image. Moreover, it’s essential to contemplate the likely effect on the picture’s quality and aesthetic appeal before undertaking any alterations.


Leave a Comment