Overview and Importance of Using Google Slides in Presentations
Imagine making an eye-catching presentation that not only presents your content but also looks ideal to capture the attention of your audience. Google Slides meets that need. It is an effective and user-friendly application that assists you in creating and editing interesting presentations. How to make an image transparent is one of their most beneficial aspects. You may add layers of pictures, add background to photo, and direct emphasis to particular areas to keep the audience actively involved. Creating engaging presentations is of greater importance than ever because people’s attention spans are growing shorter. This article will teach you how to make an image transparent in Google slides and make your presentations more visually appealing.
- Steps on How to Make an Image Transparent in Google Slides
- Practical Applications of Transparent Images
- Tips to Effectively Make Your Image Transparent
Steps on How to Make an Image Transparent in Google Slides
Google Slides have several features and tools that make it simple to create and edit presentations. Users can add text, pictures, videos, and charts, whereas the layouts, colors, and fonts can also be changed. One standout feature is the ability to adjust transparency, which leads us to this topic of how to make an image transparent on Google Slides.
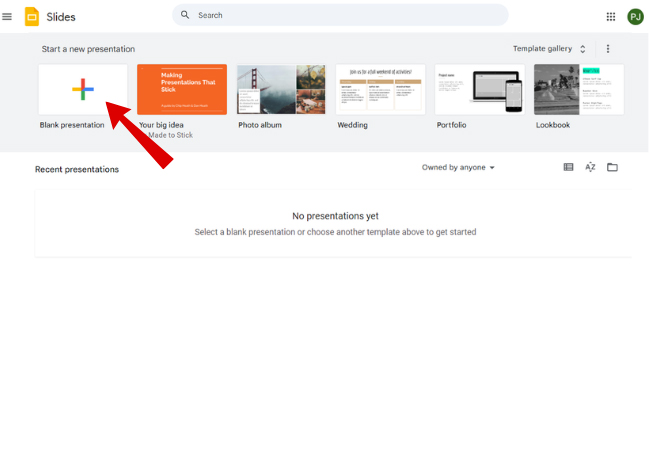
- First, go to the Google website and click the Google apps icon on the upper right corner of your screen. Afterwards, find and click “Slides”.

- Next, select “Blank Presentation”.

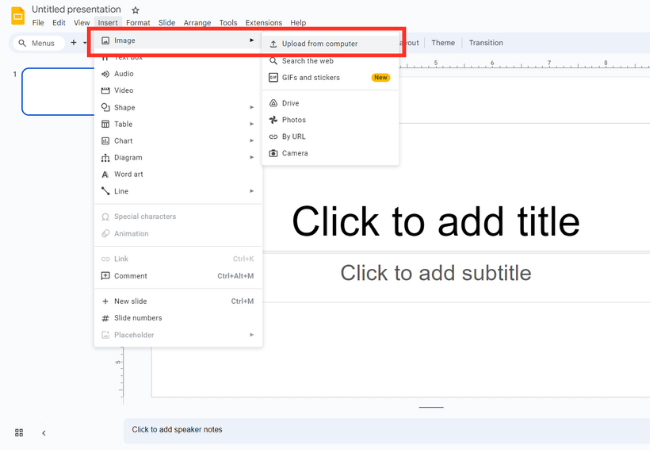
- To upload the image that you wanted to make transparent, click “Insert”.

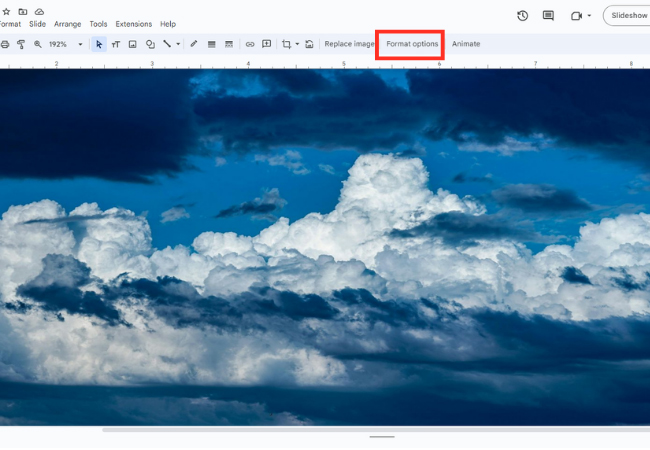
- Once your picture is ready, adjust its size and click “Format options”.

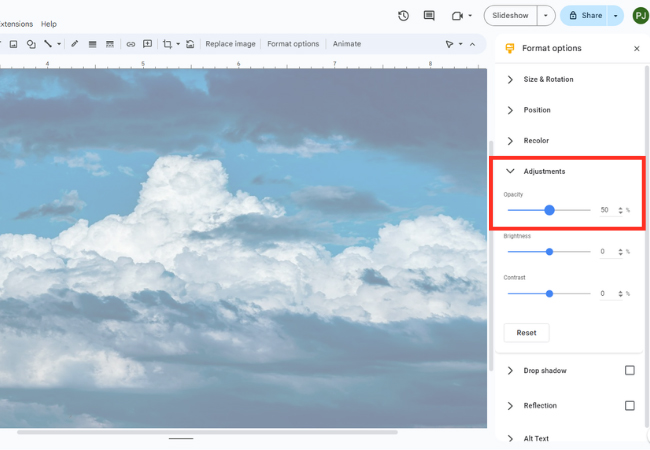
- After that, select “Adjustments” and lower down the opacity of your image.

- Finally, you can now add other pictures, texts, and other elements on your slide.

Practical Applications of Transparent Images
The overall appearance of your presentation can be improved through the use of transparent images. Here are some practical applications and tips on how to make an image transparent in Google Slides:
- Overlay Images: Images can be layered with other images when they are transparent, creating depth and dimension. For example, you can attach a semi-transparent image on a background to make your text visible and readable while maintaining the visual impact of your presentation.
- Personalized Backgrounds: You can create your own backgrounds by applying transparent textures, patterns, or even another image over a solid color. This will add a personal touch to your slides and make them more visually interesting.
- Customizing Watermarks: Knowing how to make an image transparent helps in adding watermarks on presentations. Adjusting the transparency of a watermark is frequently done by editors for it can add sophistication to your presentation and it lessens the distraction from the main content.
- Emphasizing Important Details: You can use transparent shapes or images to highlight important parts of your slides. For instance, you can attach a transparent circle or rectangle over a key component of a chart or an image to draw attention to it.
Tips to Effectively Make Your Image Transparent
- After grasping the steps on how to make an image transparent in Google Slides, make sure that your background image is not too transparent.
- Ensure that the overlaying texts are readable.
- Maintain the level of transparency on similar elements in order to preserve the uniformity of the design.
- Do not forget to use an image with high-resolution when adjusting the transparency to avoid distortion or blurriness of your image.
Conclusion
The visual appeal of your presentation can be enhanced significantly if you learn how to make an image transparent in Google slides. By following the provided steps and applying the tips, you can create captivating slides with personalized backgrounds, emphasized key points, and overlaying images.


Leave a Comment