
Simplest Ways on How to Change HEIC to JPG

What is HEIC
Comparing HEIC vs. JPEG (Advantage and Disadvantage)
HEIC or High-Efficiency file is a default image format of iOS photos. The best thing about this type of images is that they are in high resolutions yet only occupy limited space of the storage. No wonder, there are users who love to use this type of format since it can be shared quickly to other iOS devices.
Meanwhile, JPEG or Joint Photographics Experts Group or JPEG is the standard of all image formats. This image format has been used ever since digital cameras existed. If we are to compare, the advantage of HEIC image is that you can save more images on your storage. On the other hand, JPEGs are compatible with whatever devices and websites you are going to upload, transfer, and view your JPEG-formatted photos.
And that’s the downside of HEIC photos – there are devices and sites that don’t accept these type of image file. Thus, if you are wondering how to turn HEIC to JPG, below are the excellent ways you can try. Continue reading and let us help you convert your HEIC image to JPG.
How to Convert a Heic to JPG [Several Ways]
How to Change HEIC to JPG using iPhones
You don’t have to install any app if you wish to make your HEIC photos to JPEG using your iPhones. All you just have to do is to change your camera settings to HEIC to JPG as your default output format. However, just to remind you, JPG images take more space than HEIC and will give a not-so-high quality resolution output.
Here’s how to turn HEIC to JPG on iPhones:
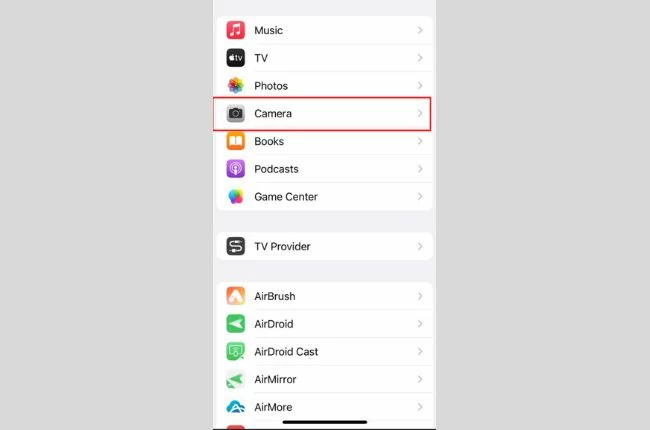
- Open your Camera settings.
![convert heic iphone camera]()
- Scroll down and tap “Optimize iPhone Storage”.
![convert heic iphone optimize]()
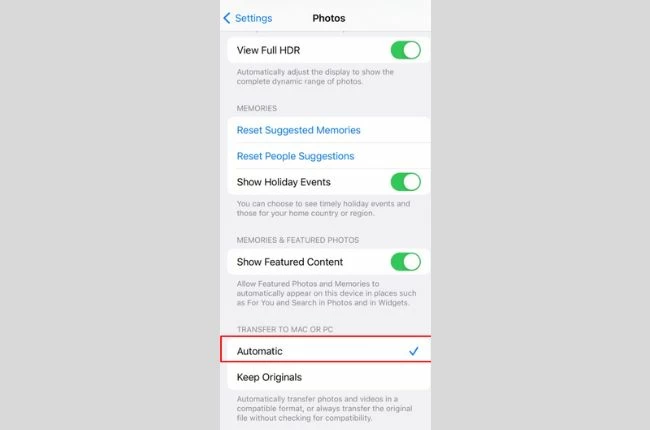
- Scroll more and under the Transfer to Mac or PC tab, tap Automatic in this way your transferred file will automatically converted into compatible format.
![heic jpg iphone transfer]()

How to Turn HEIC to JPG Automatically
Did you know that you can actually turn your HEIC images to JPG automatically? It’s the easiest way and not-time-consuming at all. All you have to do is to send your photos to the messaging apps you prefer such as Gmail, Messenger, Instagram, Whatsapp, and Viber. The moment that you save the photo from here, your image is automatically saved as JPG on your devices. You can also save them on your OneDrive since this app already converts the photos from any formats to JPG instantly.
How to Change HEIC to JPG on Windows
You don’t have to install any third party app just to convert your photos from HEIC to JPG. All you have to do is to explore your Photos app on your PC. And to make it easier for you, here are the steps on how to convert HEIC to JPG on your Windows:
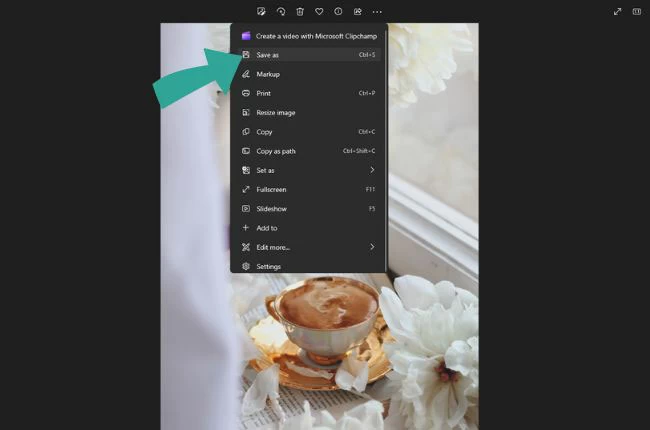
- Open the photo you want to convert and click three dots or the option button.
- From here, select the Save as or hit Ctrl + S and wait for the pop-up window.
![heic jpg windows save]()
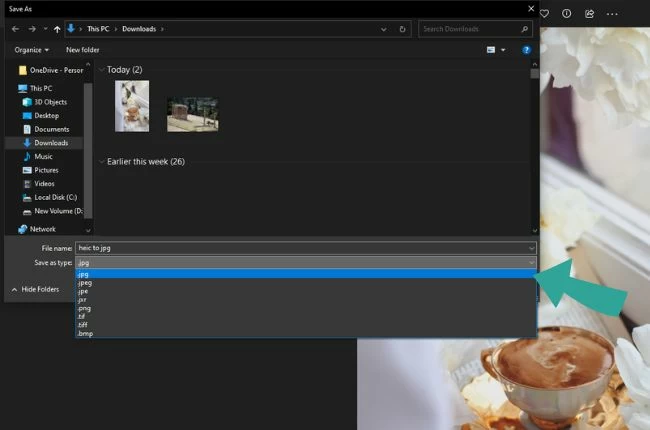
- Next, configure the file type and choose JPG.
![heic jpg windows format]()
- Hit “Save” once done.
How to Alter HEIC to JPG on Mac
If you are a Mac user, then this section is for you. You can actually use the Apple Photos app to convert HEIC to JPG. And to help you, just follow the steps mentioned below.
- Add the photo to your Apple Photos library.
- Open the app and the image you want to convert (select as many as you wish).
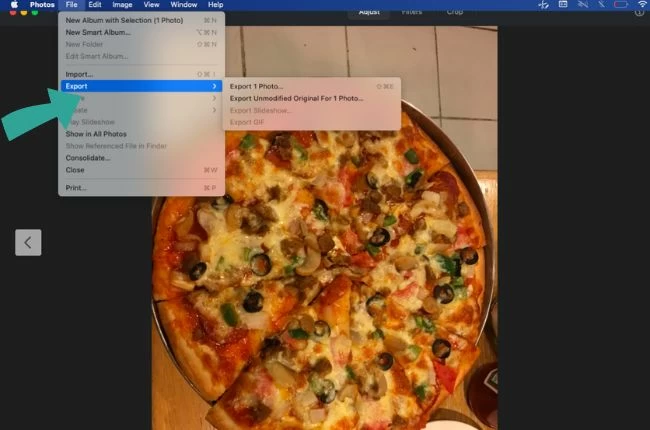
- Next, consecutively select File, Export, Export Photos.
![heic jpg mac export]()
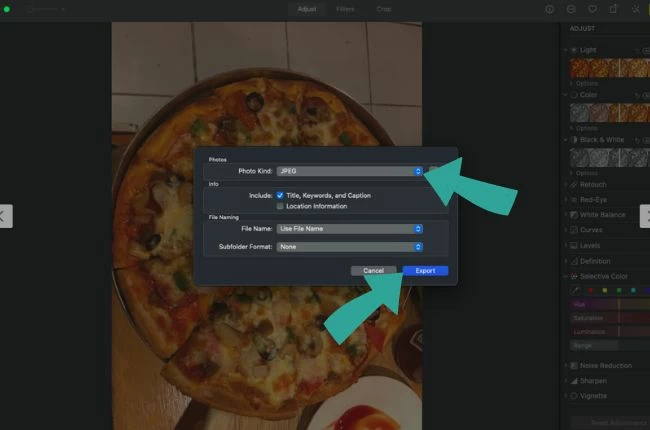
- Hit the drop-down menu and select JPG.
![heic jpg mac change]()
- And to finish it up, click Export and that’s it.
Conclusion
Now that you already have several ways of how to change HEIC to JPG, you no longer have to worry about the incompatibility of your HEIC photos with the other devices and sites. However, since HEIC and JPG have their own strengths and weaknesses, trying to convert them is somewhat a risk to take. Good news, this feature will be available soon in PicWish. You can achieve it more convenient soon.
Leave a Comment