One of the best ways to prevent prohibited usage of your pictures is to add a watermark, especially when sharing them online. Watermarking ensures that your work is acknowledged and safeguarded, whether you’re sharing images for your company or personal use. Thankfully, learning how to add watermark photos on iPhone is a simple process, with both built-in tools and third-party apps making it easier than ever.
- Why You Should Add a Watermark to Your Photos
- Using the iPhone’s Markup Tool to Add Watermarks
- Adding Watermarks Using Third-Party Apps
- Tips for Adding Watermark to Your Photos
Why You Should Add a Watermark to Your Photos
Adding a watermark in your images has the following major advantages:
- Protection Against Unauthorized Use: Adding a watermark to your photos discourages unauthorized use. This is particularly important when posting images on public sites like social media.
- Professional Branding: Adding a logo or company name as a watermark guarantees that your work is always credited to you, which is beneficial for influencers or businesses. Knowing how to add watermark photos on iPhone helps build brand recognition and trust among your audience.
- Enhanced Online Presence: Your photos will look more professional when your watermark is applied consistently throughout, strengthening your personal or company brand identity.
Using the iPhone’s Markup Tool to Add Watermarks
You can add a simple watermark to your images with the built-in Markup tool on the iPhone. Just follow the following steps:
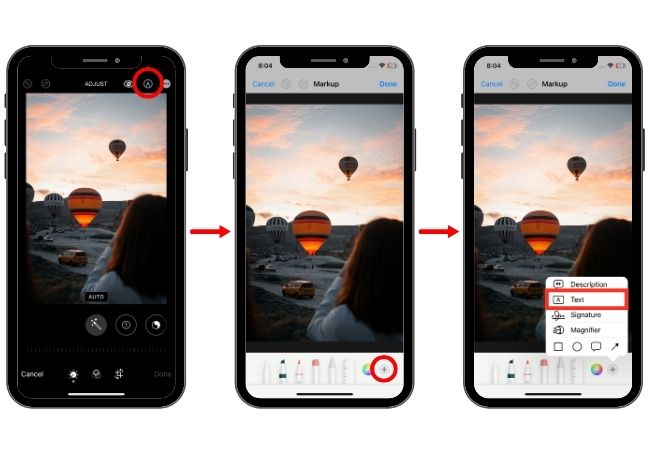
- First, open the Photos app on your iPhone and select the image that you want to put a watermark on. Then, tap “Edit” on the upper right corner of your screen.

- Next, tap the Markup icon on the upper right corner of your screen and select the “+” button on the bottom right corner of your screen. Then tap “Text”.
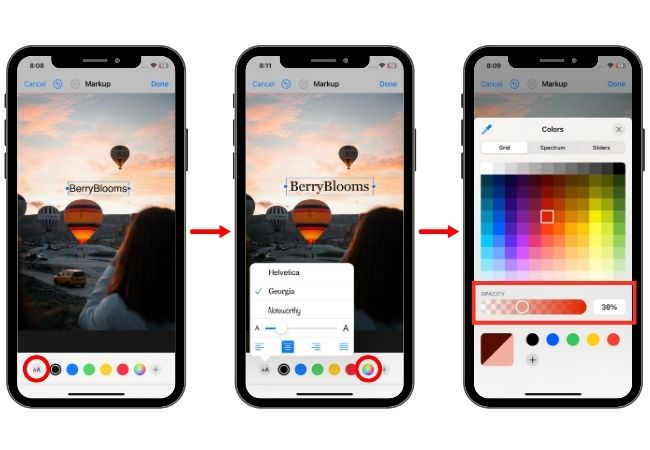
- After that, you can type the brand name of your watermark on the textbox. To adjust the font style and size, tap the double A icon on the bottom left of your screen.
- Next, to make it transparent, tap the color picker icon and adjust the opacity. You can now position your watermark to your preferred spot on the picture.
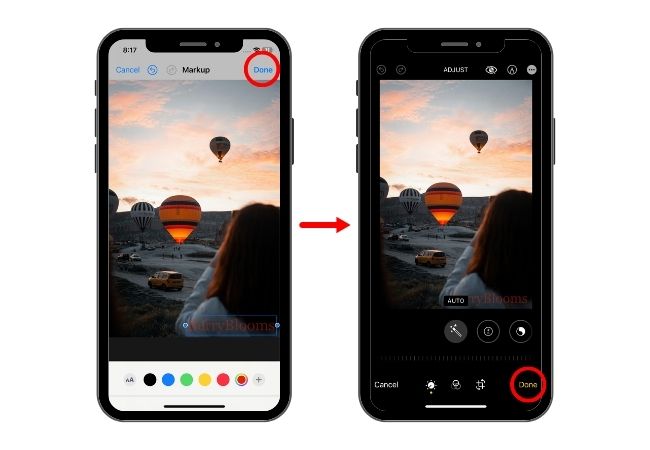
- Lastly, select “Done” to save your edits and complete the process of how to add watermark photos on iPhone.
Adding Watermarks Using Third-Party Apps
For simple watermarking, the Markup tool works well, but there are several third-party tools that offer additional options and customization choices. Among the top applications on your iPhone for watermarking pictures are PicWish, Canva, and Watermarkly.
PicWish
PicWish is a strong AI-powered photo editor that supports watermarking in addition to background removal, photo enhancement, and other features. It’s a flexible tool that produces qualified results without requiring advanced editing knowledge, making it a great option for those learning how to add watermark photos on iPhone.
Steps to Add a Watermark Using PicWish:
- Download and install the PicWish app on your iPhone.
- Next, select “Edit Photo” and choose the image that you want to put a watermark on. Then tap “Add Logo”.
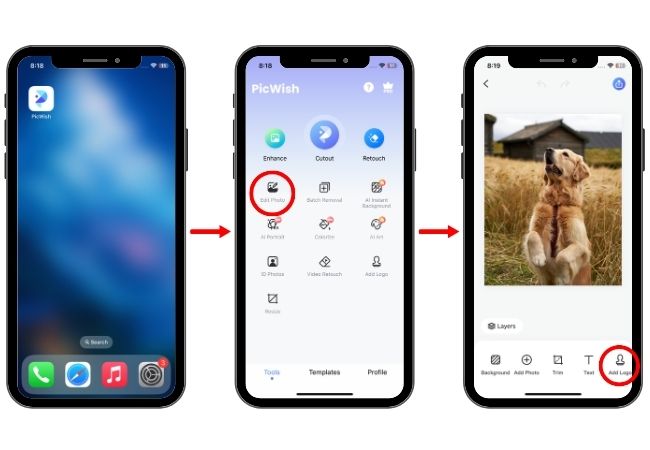
- You can add text if your watermark is a brand name and you can also add a photo of your logo as your watermark by tapping the “+” icon on your screen. After that, you can position it where you want and adjust its opacity.
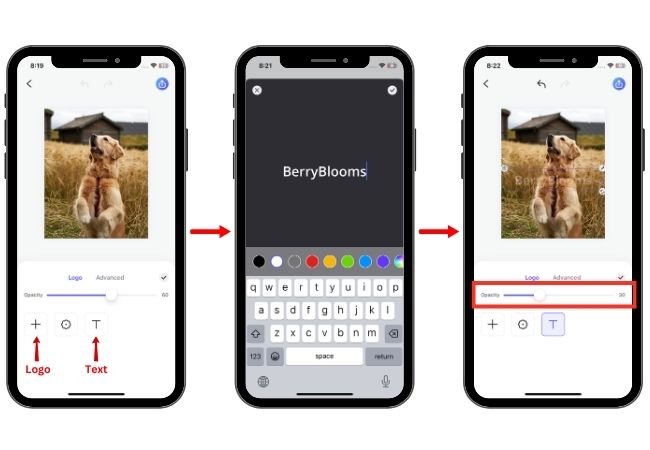
- Then, select the “Advanced” options where you can choose to have a “Tile Effect”. After that, you can adjust the size, spacing, rotation, and offset of your watermark.

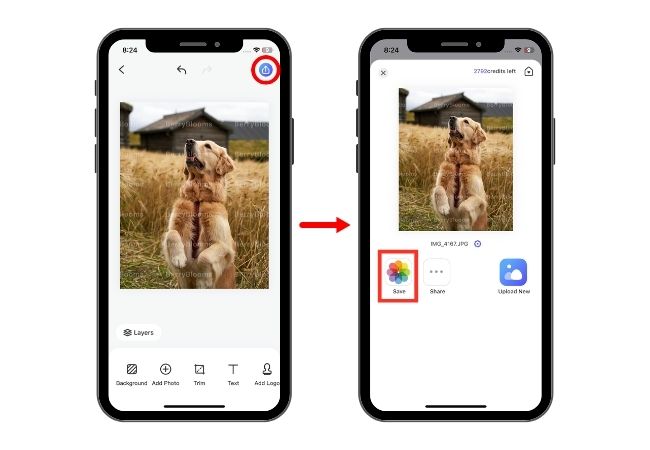
- Once satisfied, tap the check icon and then the download icon on the upper right corner of your screen and select “Save”.
Canva
Canva is a well-known graphic design application that provides a user-friendly interface for producing diverse visual content. It’s a flexible tool that produces qualified results without requiring advanced editing knowledge, making it a great option for those looking to understand how to add watermark photos on iPhone efficiently.
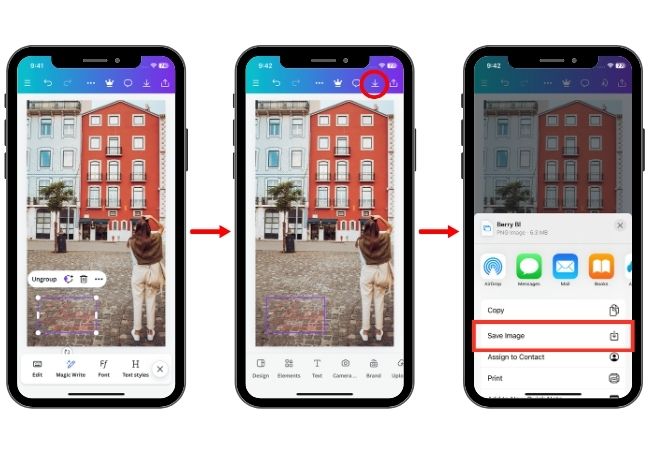
Steps to Add a Watermark Using Canva:
- First, download and install the Canva app on your iPhone.
- Tap the “+” icon on the bottom part of your screen and select the custom size icon to type your preferred size of your image. After that, press “Create new design”.
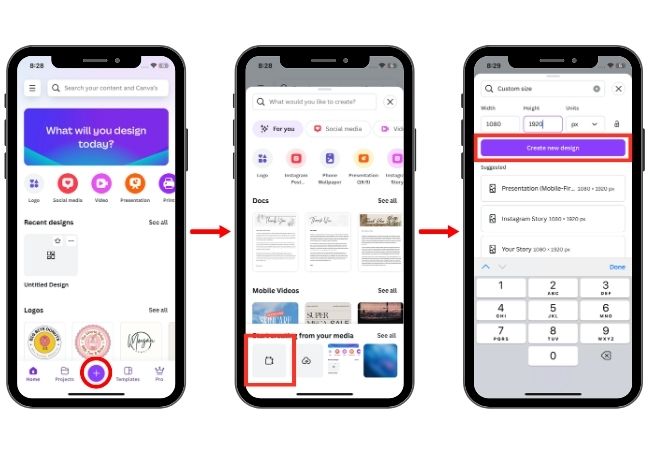
- Next, choose the image that you want to put a watermark on from your gallery or from your uploads. Then tap “Add to page”.

- You can add text as your watermark and customize it with Canva’s customize options or you can upload your own logo.
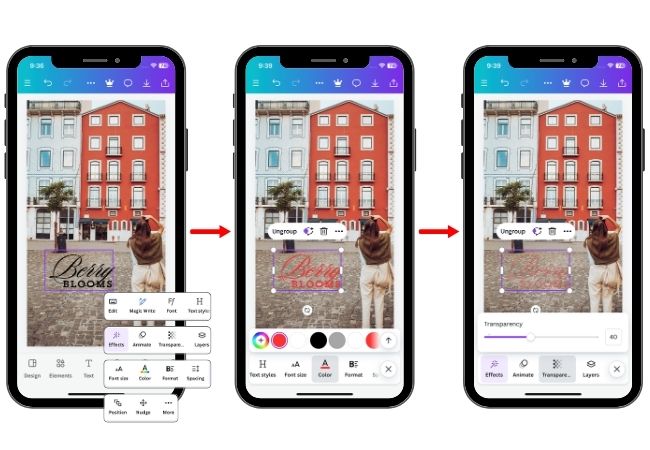
- Now, you can adjust the size and position of your watermark on the image.
- Lastly, tap the download icon to save your image.
Watermarkly
With competent watermarking features like batch processing and customization, Watermarkly is a dedicated watermarking tool. For users who want to learn how to add watermark photos on iPhone or create personalized watermarks and watermark multiple pictures at once, this is the perfect tool.
Steps to Add a Watermark Using Watermarkly:
- Download and install the Watermarkly app on your iPhone first.
- Tap “Select Files” and choose the image that you want to put a watermark on. Then, press “Next Step”.
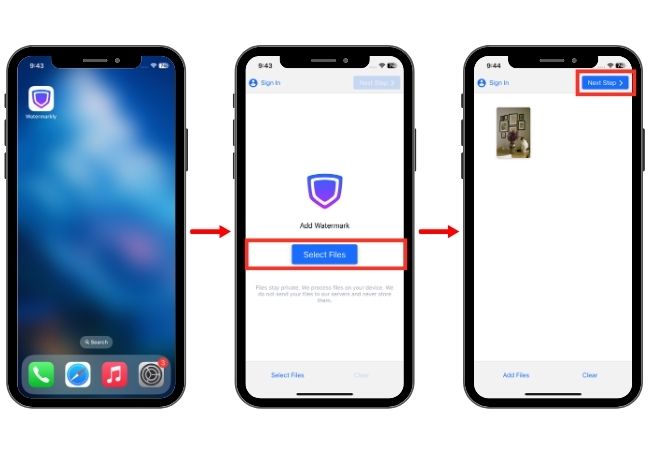
- You can add text or logo as your watermark. After that, you can adjust the font, color, size, tile, opacity, rotation, and even add an effect frame on it.

- Tap “Next Step” where you may resize the image or preview & adjust. Lastly, to save your image, select “Watermark Images”.

Tips for Adding Watermark to Your Photos
When learning how to add watermark photos on iPhone, it’s essential to apply watermarks in a way that protects your images without compromising their visual appeal. Here are some tips that you can follow for better results of adding your watermark:
- Choose a subtle yet crucial spot of your photo to put your watermark on. This is to avoid distraction but at the same time, prevents the easy removal of your watermark on your photo.
- To make your watermark blend in with the image without overpowering the visual content, reduce its opacity a little.
- Keep your photos consistent in terms of font, color, and size to keep them looking professional and increase brand awareness.
Conclusion
Using the more advanced third-party apps or the built-in Markup tool, learning how to add watermark photos on iPhone is a simple process.Watermarking your images is an easy way to keep ownership of your work, whether you’re wanting to brand your business effort or safeguard your personal photos. Your watermarks will complement your images without taking up any more space if you follow the tips for placement and design. Thus, take your time in determining which watermarking technique will work best for you and begin protecting your images right away.


Leave a Comment