

The iPhone has evolved into one of the most powerful photography tools you can carry in your pocket. With each new model, Apple continues to push the boundaries of what a smartphone camera can do. Now, its camera app offers like Night mode, Portrait mode, and advanced image processing that rival professional gear. But capturing stunning photos isn’t just about the hardware, it’s about knowing how to use it. With a few simple tips and tricks, you can take your iPhone photography from average to eye-catching. By the end of this article, you’ll walk away with 15 practical iPhone photography tips that can instantly improve your shots.
15 iPhone Photography Tips
- Understanding Your iPhone Camera
- Framing & Composition Tips
- Lighting Techniques
- Camera Settings and Shooting Tricks
- Editing and Post-Processing
Understanding Your iPhone Camera
Before diving into fancy editing apps or framing techniques, it’s important to understand the camera you’re working with. The iPhone camera comes packed with powerful features, and knowing how to use them can make a world of difference in your photos.

1. Know Your iPhone Camera Features
Apple designs its iPhone cameras to be intuitive, but there’s more beneath the surface. Start by exploring built-in features like:
- HDR (High Dynamic Range): This helps balance light and dark areas in high-contrast scenes, making it perfect for landscapes or tricky lighting.
- Live Photos: Capture a few seconds of movement and sound before and after your shot.
- Portrait Mode: Available on newer models, this feature adds a depth-of-field effect to mimic the look of DSLR photography. It works best for people but can also be used creatively with objects.
- Night Mode: Lets you shoot clear, low-light photos without using a flash.
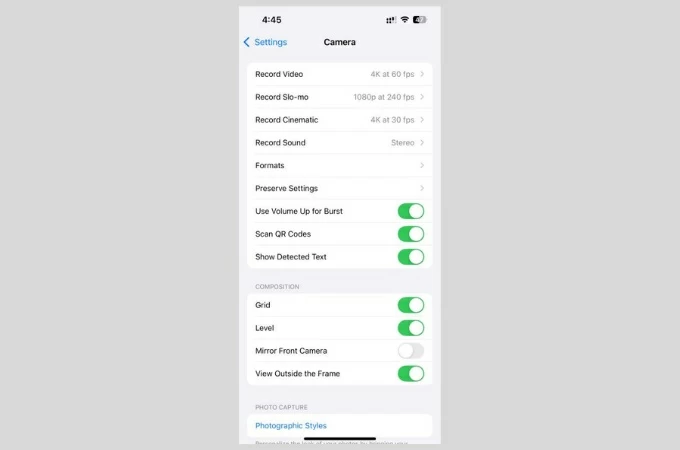
2. Use the Grid for Better Composition
One of the easiest ways to improve your photo composition is by turning on the grid in your camera settings. The grid divides your screen into nine equal parts using two horizontal and two vertical lines. This helps you apply the Rule of Thirds. Meanwhile, go to Settings > Camera > Toggle on Grid. Once it’s on, you’ll see it appear in your camera viewfinder, helping you line up shots like a pro.
3. Tap to Focus and Adjust Exposure
Your iPhone’s camera does a great job of auto-focusing, but for more precision, you can manually focus on a specific part of your shot by simply tapping on the screen. This tells your camera exactly where to focus. After tapping, you’ll also see a sun icon appear next to the focus box. This allows you to adjust the exposure. Slide the sun up or down to make the image brighter or darker depending on your scene.
Framing & Composition Tips
A well-composed photo is often what separates an average snapshot from a visually stunning image. While iPhones come equipped with powerful cameras, knowing how to frame your shots can make all the difference. These simple composition tips will help you take more intentional and eye-catching photos.

4. Follow the Rule of Thirds
The Rule of Thirds is one of the most fundamental principles in photography. By dividing your frame into a 3×3 grid, you can position key elements along the lines or where they intersect.
Instead of placing your subject dead-center, try aligning it to one side or corner of the grid. This creates a sense of balance and movement in your photo, making it feel more natural and engaging. Whether you’re capturing a person, a landscape, or a detail shot, this simple tweak can elevate the overall look.
5. Use Leading Lines
Leading lines are visual paths that guide the viewer’s eye through the image, often toward the main subject. These lines can be anything: roads, fences, rivers, walls, or even shadows. Look for natural or man-made lines in your environment and use them to draw attention to your subject. Shooting along a footpath or a row of trees, for instance, can create depth and interest, pulling the viewer into your scene.
6. Experiment with Symmetry and Patterns
Symmetry and repetition are powerful visual tools, especially when photographing architecture, nature, or minimalist scenes. Symmetrical photos create a sense of harmony and order, while patterns can add texture and rhythm to your composition. Try positioning yourself directly in front of symmetrical subjects or capturing repeating elements from unique angles. These kinds of shots are especially striking when kept simple and clean.
7. Change Your Perspective
One of the easiest ways to make your iPhone photos stand out is to change your shooting angle. Most people shoot at eye level, but you can instantly create a more compelling image by getting low to the ground, shooting from above, or tilting your phone at an angle.
Lighting Techniques
Great lighting is one of the most important elements in photography. While your camera can handle a lot, knowing how to work with light will elevate your photos from basic to brilliant. These simple lighting techniques will help you capture clear, vibrant, and professional-looking shots.

8. Shoot in Natural Light Whenever Possible
Natural light offers a softness and warmth that artificial lighting or your iPhone’s flash often can’t replicate. Flash can flatten your subject, add harsh shadows, or cause unwanted reflections, especially in close-up shots.
Whenever possible, position your subject near a natural light source. The gentle, even lighting will help bring out details, enhance skin tones, and create a more natural-looking photo. This is especially helpful for portraits, food photography, and still life shots.
9. Avoid Harsh Midday Sun
While sunlight is a great tool, the midday sun can be too intense. It creates harsh shadows, overexposed highlights, and unflattering contrast, particularly on faces.
Instead, aim to shoot during the golden hour, which occurs shortly after sunrise and just before sunset. During these times, the sun is lower in the sky and casts a soft, warm glow that flatters your subject and adds a magical, cinematic quality to your photos. It’s a favourite lighting condition among photographers for a reason.
10. Use Reflectors or White Surfaces
When you’re dealing with uneven lighting or shadows using a reflector or white surface can work wonders. Items like white cardboard, paper, or even a light-colored wall can help bounce light back onto your subject. Thus brightening darker areas without introducing artificial light.
This technique is useful both indoors and outdoors. For example, if you’re photographing someone near a window and one side of their face is in shadow, placing a white surface on the opposite side will reflect light and even out the exposure. It’s a simple trick that adds polish and professionalism to your iPhone photos.
Camera Settings and Shooting Tricks
Beyond the basics, your iPhone camera has a few hidden gems that can help you capture sharper, more dynamic shots. These camera settings and tricks are easy to master and can make a noticeable difference in your photography.
11. Use Burst Mode for Action Shots
Capturing movement can be tricky. That’s where Burst Mode comes in. This feature rapidly takes a series of photos, increasing your chances of getting the perfect shot without blur.
To use Burst Mode on most iPhones, swipe the shutter button to the left and hold it down. Once you release it, you’ll be able to scroll through all the frames and pick the best one. It’s especially handy for fast-paced moments you don’t want to miss.
12. Try Portrait Mode Creatively
Most people associate Portrait Mode with selfies or headshots, but its use goes far beyond faces. This feature uses depth mapping to blur the background. Thus creating a bokeh effect that mimics the look of a DSLR.
You can use Portrait Mode for objects like flowers, coffee cups, or jewelry to give them a professional product-photo look. It’s also great for close-up shots where you want your subject to pop against a soft, out-of-focus background. Don’t be afraid to get creative and experiment with lighting effects available in the Portrait Mode editor, like Studio or Stage Light.
13. Lock Focus and Exposure (AE/AF Lock)
If your iPhone keeps shifting focus or adjusting brightness automatically, you can take control by using the AE/AF Lock (Auto Exposure/Auto Focus Lock). This is especially useful in tricky lighting or when you want a consistent look across multiple shots.
To enable it, simply tap and hold on the screen where you want to set the focus. You’ll see “AE/AF Lock” appear at the top of the screen, meaning the camera won’t shift focus or exposure even if you move slightly. This small trick is a game changer for shooting in low light, capturing close-ups, or when you’re composing a static scene.
Editing and Post-Processing
Taking a great photo is only half the job, you still need to edit the photo to bring out its full potential. Whether it’s a simple brightness adjustment or a full creative transformation, post-processing can enhance your shots and give them a polished, professional finish. And the best part? You can do it all on your iPhone.

14. Use Built-In Editing Tools First
Before jumping into third-party apps, take advantage of the built-in editing tools in the Photos app. Apple’s editor lets you fine-tune lighting, contrast, sharpness, saturation, and color balance with just a few taps.
To edit a photo, open it in the Photos app, tap Edit, and start adjusting the sliders. Begin with basics like exposure, shadows, highlights, and warmth. You’ll be surprised how much of a difference small tweaks can make. The key is to keep your edits natural. Avoid overdoing filters or pushing settings too far, as it can make your photos look artificial. The goal is to enhance the original image.
15. Try Mobile Editing Apps for More Control
If you want more creative flexibility, explore powerful mobile editing apps like PicWish. It is a user-friendly app that offers pro-level tools, including photo enhancer. With this, it allows you to enhance your iPhone photos without needing a computer.
Conclusion
You don’t need expensive gear or years of photography experience to take stunning photos. By understanding how your iPhone camera works, you take scroll-stopping images. Also, these 15 iPhone photography tips are designed to help you shoot with confidence and creativity. So grab your phone, get out there, and start snapping. Happy shooting!
Leave a Comment